STATURE LENGTHENING CONSULTATION AND SURGERY

SURGERY OVERVIEW
SURGERY OVERVIEW
You will have a preoperative visit with the surgery team to go over the consent form and all of the paperwork. You will also have an appointment with our preoperative nurse and anesthesiologist. You can discuss your anesthesia and postoperative pain management in advance of the surgery. You will be given instructions for surgery. You should not eat or drink after midnight before the surgery, and you should come in two hours before your scheduled surgery time, to the preoperative area in the Kimmel building on the campus of St. Mary’s Hospital, 901 45th St.
The stature lengthening surgery consists of an osteotomy (breaking the bone surgically through a small incision) and insertion of the lengthening nail (the STRYDE).
There are many things that the surgeon must consider for stature lengthening surgery. It is important to determine the ideal nail length, insertion point (e.g. trochanteric vs. piriformis in the femur) and osteotomy level.
STRYDE NAIL TECHNIQUE
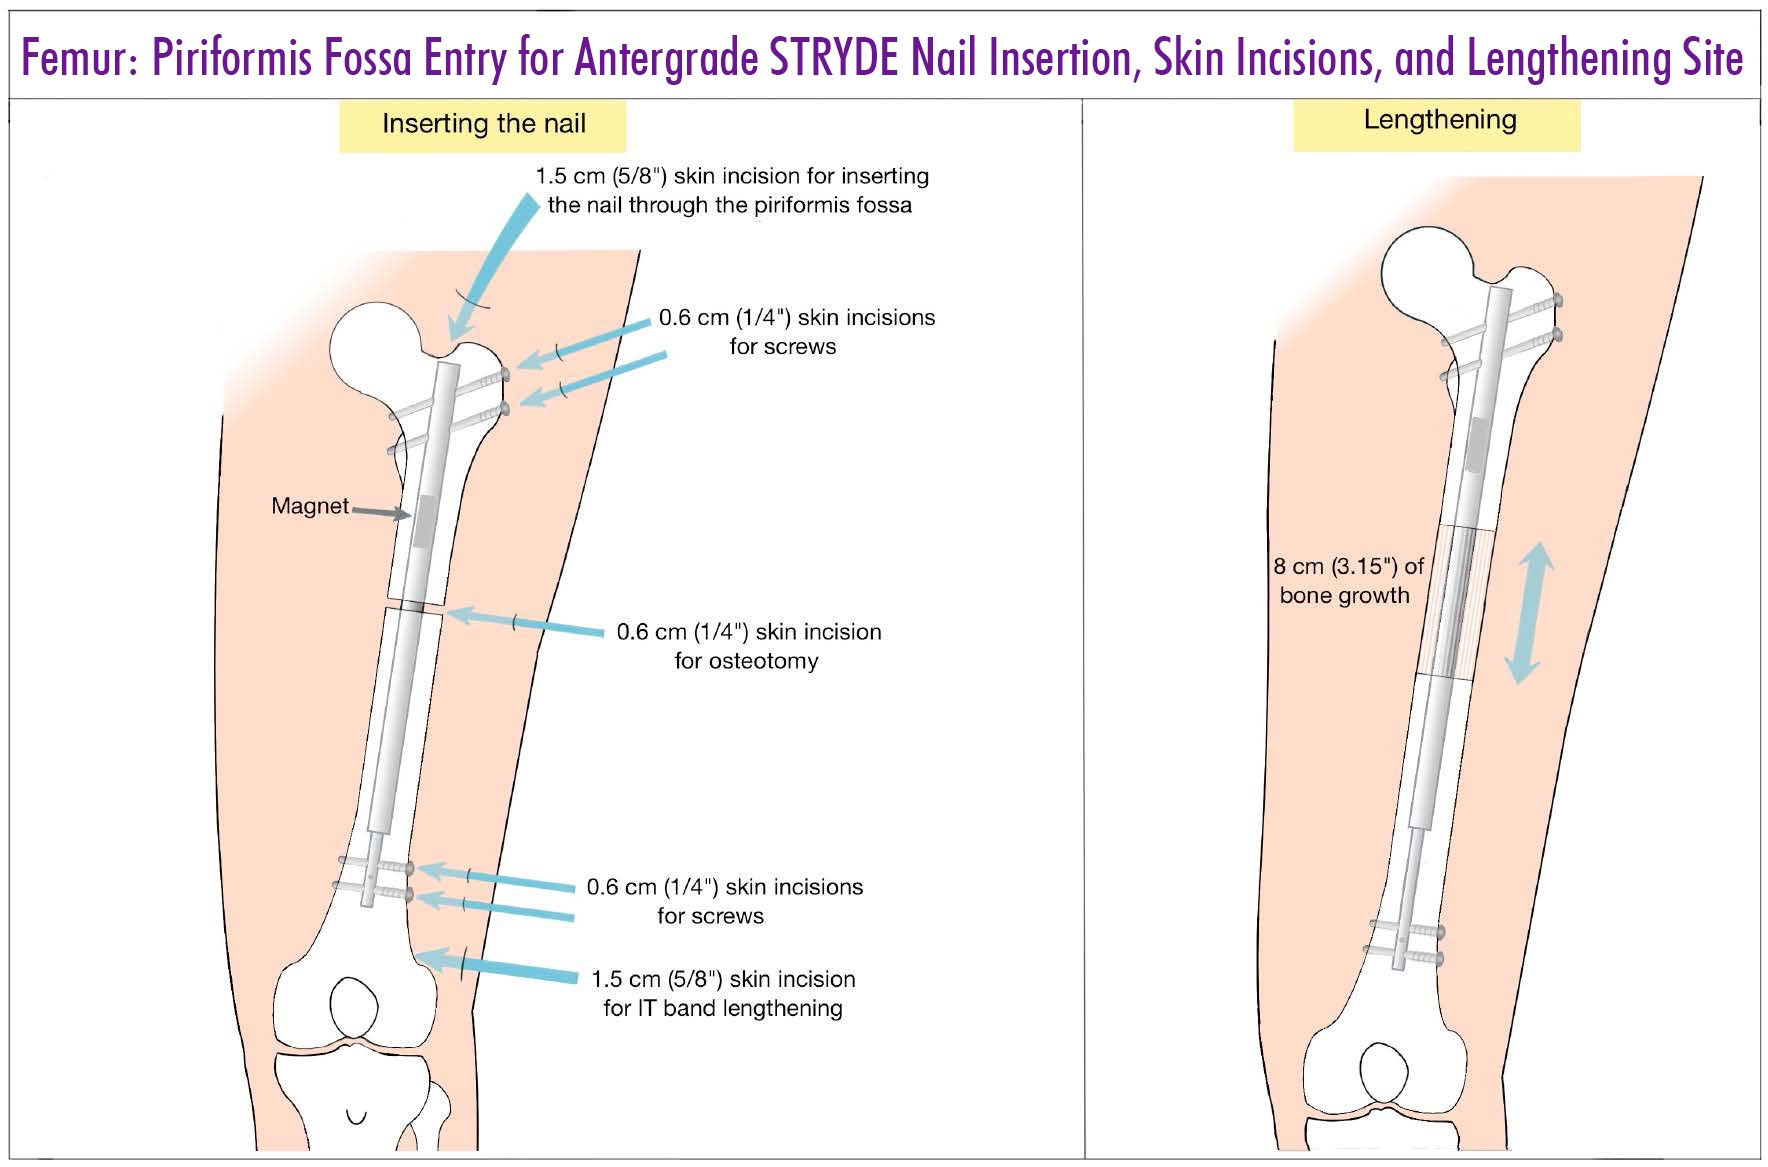
The surgical technique for the STRYDE nail is identical to that for the Precice P2 except for the special drill bits required for the locking screws. The STRYDE nail comes in 10, 11.5, and 13mm diameters. The STRYDE nail comes in 5cm, 6.5cm and 8cm lengthening amounts corresponding to minimal lengths of 235mm, 250mm and 265mm. The 8cm lengthening nail is available in longer lengths (280, 305, 335, 365 mm). The STRYDE nail for the femur also comes in trochanteric and piriformis entry configurations. There is only one configuration for the tibia.
The level of osteotomy is calculated the same way as for Precice. The upper and lower ends of the nail are marked on the skin depending on the length of nail chosen. Measuring retrograde from the lower end of the nail, mark the lowest permissible level of the osteotomy, which is the sum of the total amount of desired lengthening, plus three cm of planned overlap, plus 3cm (representing the amount of the inner lengthening rod protruding from the outer tube). This will ensure that at least three cm of overlap of the outer tube is within the bone segment on the other side of the distraction gap.
FEMUR ANTEGRADE
Piriformis nails are preferred in skeletally mature patients. Trochanteric nails are used in skeletally immature patients or those whose anatomy precludes a piriformis nail.
AUTHORS’ PREFERRED TECHNIQUE
- Position patient supine on radiolucent operating table and prep and drape up to the ribs with the leg free.
- Mark the level of the tip of the greater trochanter on the skin. Measure from that point the desired length of the nail and mark its lower end. Measure back from there (as described above) to identify the lowest permissible level of the osteotomy. Make the osteotomy at any point proximal to that level.
- Make a lateral stab wound at the level of planned osteotomy and use the 4mm or 5mm drill bit to make multiple drill holes at the osteotomy level. First make one entrance and three exit holes and then make two additional entrance holes so that you now have a total of 6 holes drilled in the femur. These will allow decompression of the canal to avoid fat embolism and will also allow the reamings to graft the osteotomy site.
- Insert a Steinmann pin percutaneously into the proximal medial tip of the greater trochanter or into the piriformis fossa with the leg adducted. Confirm with image intensifier on AP and lateral views.
- Make a 15mm incision around the pin and ream open the starting point with a 10 mm ACL reamer
- Insert the beaded guide rod down the femur.
- Ream the femur in 1mm increments until there is chatter and then reduce to half mm increments.
- Ream two mm greater than the diameter of the nail to be used (e.g. 12mm for 10mm nail, 13.5mm for 11.5mm nail, 15mm for 13mm nail)
- Insert the selected STRYDE nail down to the level of the planned osteotomy.
- Two assistants are needed to support the limb: one holds onto the foot and supports it in the air with traction and without rotating the foot. The leg should not touch anything that could give it support. The other holds the nail with its introducer and lifts towards the ceiling to create an extension moment arm.
- With the extension moment in place use an osteotome through the lateral incision to osteotomize the femur percutaneously. Once the bone is heard to break, test that it is broken by gently applying a valgus and varus stress and watching it bend with fluoroscopy. (The surgeon applies one hand on the lower leg and one on the handle of the nail. Both assistants continue the extension moment while allowing the surgeon to stress the osteotomy site. No loss of rotation occurs since the anterior cortex of the bone is under compression from the extension moment and traction.)
- The nail is advanced down the femur crossing the osteotomy site. Once it is safely on the other side, the assistant holding the leg lowers it down to rest on the table while maintaining traction. The nail is advanced until its upper end is at the level of the top of the piriformis fossa or seated in the greater trochanter for piriformis vs trochanteric nails respectively.
- Lock the nail proximally with the locking screw insertion jig. Mark the skin with the drill sleeves for the proximal two holes. Then make one skin incision that will be used for both drill holes. Drill the more distal proximal screw first. This makes sure that you start on the greater trochanter and do not move down into the concavity at its base where it is more difficult to start. Use the step drill and drill both corticies. Do not allow the drill to advance past the second cortex. Insert the STRYDE screw using power on the ream setting. Now drill the most proximal of the proximal screws.
- Free hand lock the distal holes after creating perfect circles on the image intensifier in the lateral position. Insert a bayonet tipped wire into the two distal holes. Use a cannulated drill for the first cortex and then drill the second cortex with a solid step drill. Insert the first lower locking screw and then repeat the process for the second one.
- Curette out the reamings from the proximal nail incision.
- No blocking screws are needed except if the osteotomy is very proximal, above the level of the isthmus. If needed, insert a medial blocking screw using the Precice pegs.
- All the incisions are closed.
- Femur soft tissue releases: For cosmetic stature lengthening of the femur the iliotibial band (ITB) and intermuscular septum should be transected together with a biceps aponeurosis recession. This is performed through a 3cm lateral distal thigh incision at the level of the proximal pole of the patella. Care is taken not to cause bleeding from the lateral geniculate artery. For congenital cases the fascia lata is transected at the level of the greater trochanter through a small incision in addition to the distal ITB and biceps releases. Post-traumatic and developmental cases may not need the ITB and biceps cut unless they have a positive Ober sign and large popliteal angle.
FEMUR SOFT TISSUE RELEASES:
For cosmetic stature lengthening of the femur the iliotibial band (ITB) and intermuscular septum should be transected together with a biceps aponeurosis recession. This is performed through a 3cm lateral distal thigh incision at the level of the proximal pole of the patella. Care is taken not to cause bleeding from the lateral geniculate artery. For congenital cases the fascia lata is transected at the level of the greater trochanter through a small incision in addition to the distal ITB and biceps releases. Post-traumatic and developmental cases may not need the ITB and biceps cut unless they have a positive Ober sign and large popliteal angle.
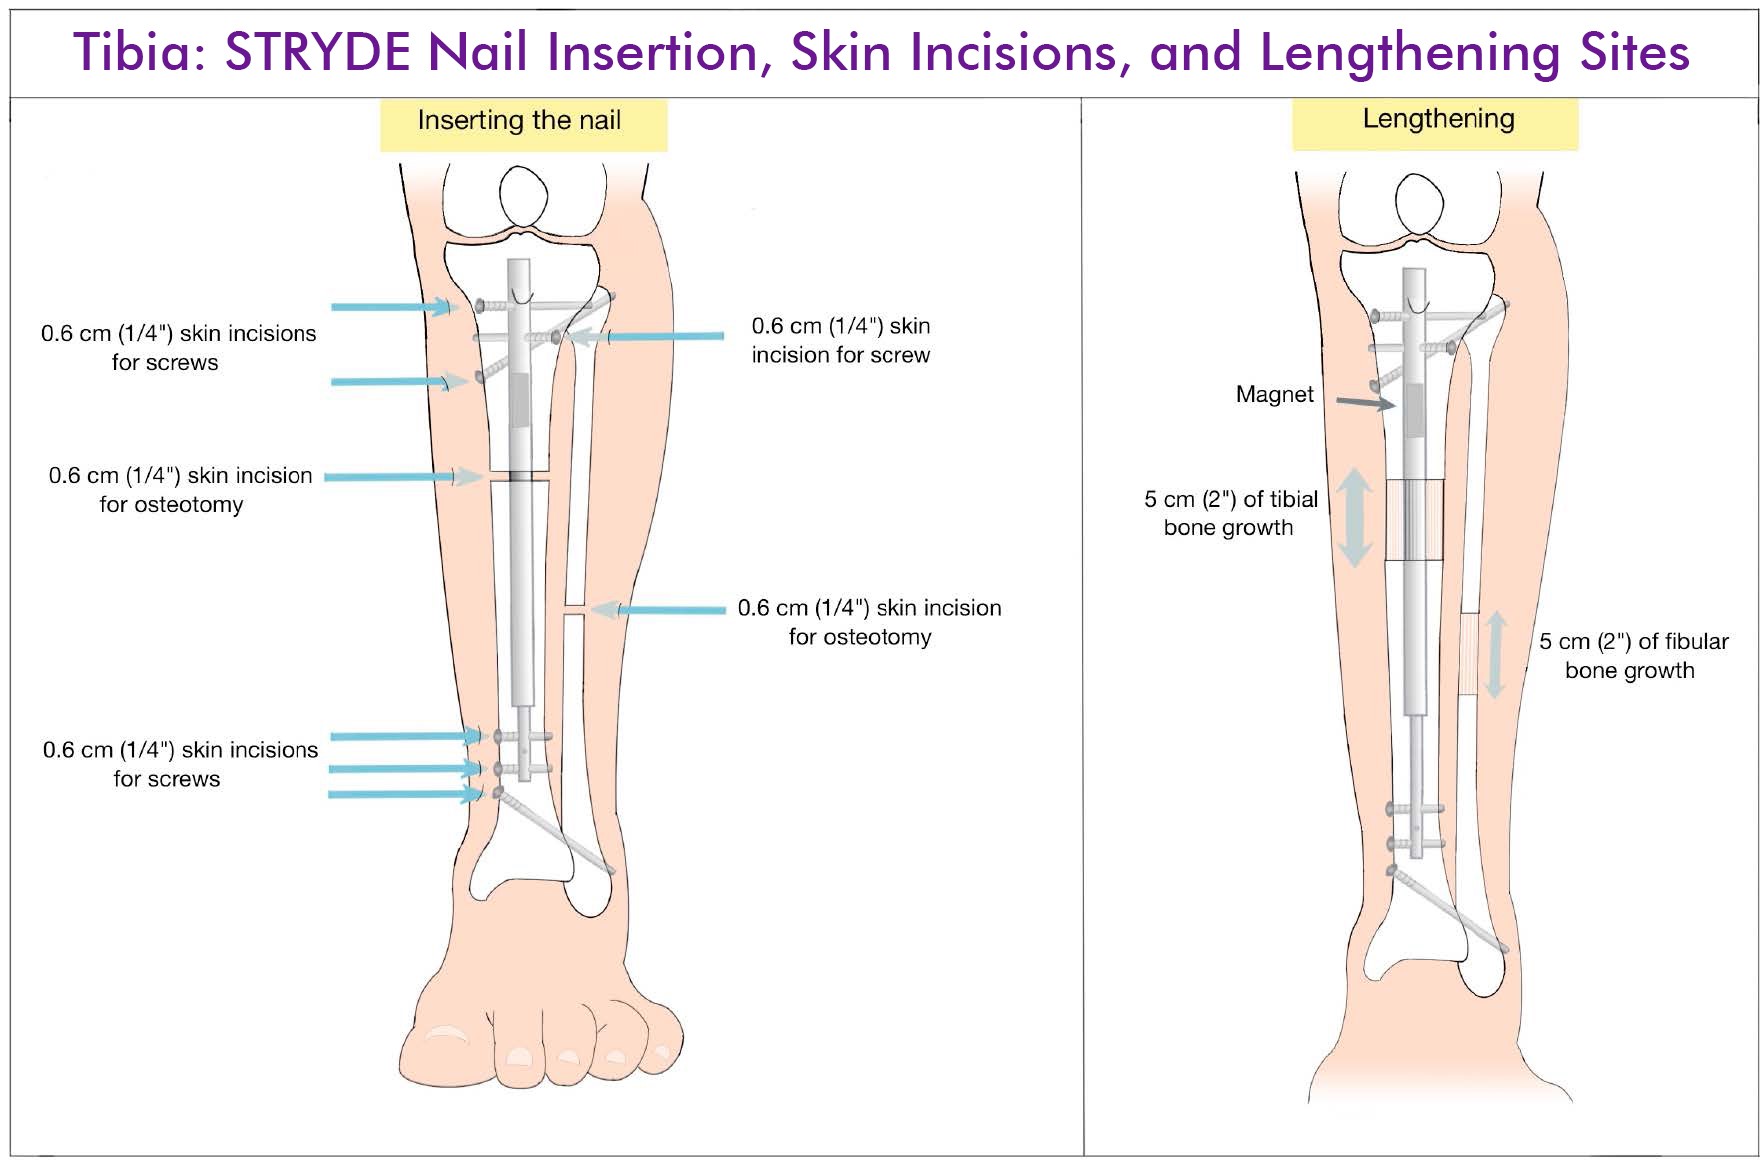
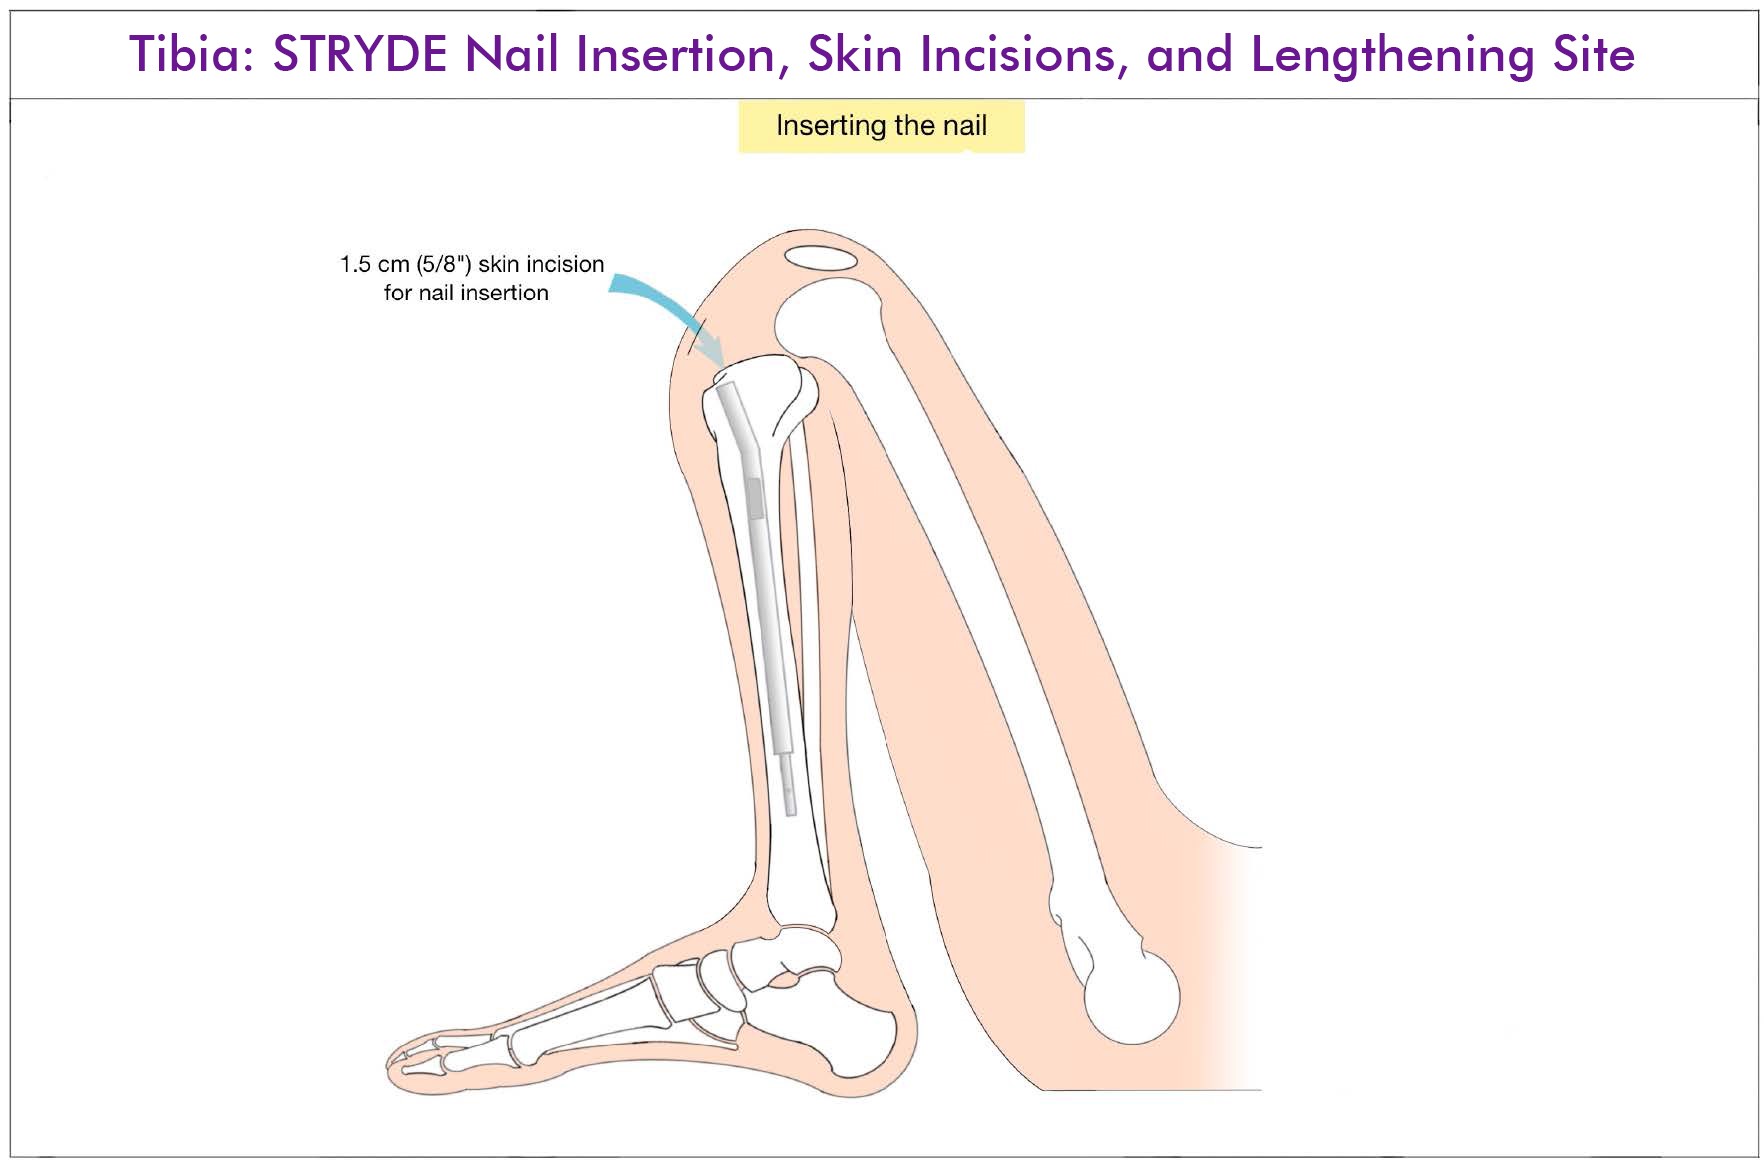
TIBIA ANTEGRADE
AUTHORS’ PREFERRED TECHNIQUE- Position the patient supine on a radiolucent table
- Make a 3cm posterolateral incision in the midcalf and cut the fibula subperiosteally. Expose the fibula between the gastrocnemius and peroneal muscles. Drill holes in the fibula with a bayonet tipped wire and then use a small diameter osteotome to complete the osteotomy. If there is need for a peroneal nerve decompression, then first do the decompression and then expose the neck of the fibula and cut the bone under direct vision with a saw and osteotome.
- Mark the proximal and distal ends of the nail on the skin and the planned level of the osteotomy.
- Flex the knee maximally and insert a Steinmann pin medial parapatellar into the superior surface of the tibial plateau. Do not start in the space between the joint line and the tuberosity.
- Use an ACL reamer to create the starting hole.
- Insert the beaded guidewire down the tibia.
- Ream the tibia 2mm greater than the desired nail diameter.
- Remove the guide wire and lay the leg flat and supine.
- Make a 1cm incision over the planned osteotomy level and make multiple drill holes at that level with a 4mm drill bit.
- Use an osteotome to complete the osteotomy; try not to propagate the osteotomy proximally or distally.
- Flex the knee again and insert the STRYDE nail.
- Lock the nail proximally with three locking screws using the step drill.
- Remove the proximal locking guide and free hand lock the distal end with the leg supine again.
- Lock with 2 screws using the cannulated wire method described for the femur.
- Insert a lateral blocking screw in the proximal segment using a Precice peg. Insert a posterior blocking screw using a Precice peg to prevent procurvatum if the rod is not touching the posterior cortex. Insert a distal tibiofibular screw. Insert a wire from the fibula to the tibia inclined from distal to proximal. Step 16Exit out the medial side and use another wire to measure the length. Drill with a cannulated drill from the medial side and insert a Precice peg from medial to lateral.
- Insert a proximal tibiofibular screw using a Precice peg. Insert a bayonet wire from the tibia to the neck of the fibula by rotating the leg till the two are overlapping under lateral fluoroscopy. Drill over this wire with a cannulated drill and then insert a Precice peg from medial to lateral.
- Curette the reamings from the nail insertion incision
- All the incisions are closed.
- Soft tissue releases for the tibia: Achilles tendon lengthening and gastro-soleus aponeurosis lengthening should be avoided so as not to weaken push-off. The latter is preferred over the former. Prior to waking the patient, the nail is tested by lengthening 1 mm acutely.
POST OP ROUTINE
Epidural, peripheral nerve block or patient controlled analgesia (PCA) using narcotics can be used for up to two days post operatively. After that, the patient is switched to oral medication which can include narcotic agents (Oxycodone, Hydrocodone), acetaminophen and anti-inflammatory medication. Beginning at discharge or at most a week later, only acetaminophen.
To prevent hematoma in the first 12 hours after surgery, especially if the iliotibial is cut, an elastic bandage can be used. In the tibia or around the knee, cryotherapy is useful to prevent excessive swelling. It is also important to elevate the limb to reduce dependent swelling. Mechanical DVT prophylaxis is recommended. A daily aspirin starting 24 hours after surgery is also used until the patient is ambulating normally.
The patient is mobilized the day after surgery. Weight bearing is tolerated in patients with STRYDE nails. The patient learns to stand and then walk with a walker. The patient learns transfers from bed to chair and back. It is essential for patients to learn to transfer to a bedside commode or the toilet. Patients are taught to walk up and down steps before discharge so that they can negotiate stairs in their home environment.
For tibial lengthening it is important to prevent the foot from laying in an equinus posture. Off the shelf or, preferably, custom dorsiflexion splints are used to keep the Achilles under stretch at all times.
No one wants unexpected problems, complications and costs. For these reasons I am very conservative regarding many aspects of the limb lengthening process. I try and anticipate problems and prevent complications. Many complications lead to additional surgery and therefore to additional costs.